アドベントカレンダー4日目担当の高畑です。
最近ぷよぷよは休業して、モンスターを狩って素材を集めたり、モンスターを捕まえて育てたりと
モンスターに囲まれた生活をしています。
お腹周りのおじゃまぷよは以前より減って来ました。
最近は社内でネイティブアプリを作る時に、動きがある部分に関しては
デザイナーの方にkeynoteでサンプルのアニメーションを見せて頂くことが多いです。
口答だけではどうにもイメージがわかないですし、いざ作って見ても「想像してたのと違う」となる可能性が高いので、最初にアニメーションの完成系が共有できるのは良いことです。
たまに容赦ないアニメーションのサンプルを見せられそれを見ては頭を抱え込むことが多くなってきました……
波打つTextViewっぽいもの
今回のテーマです。
keynoteのアニメーションの表現を擦り合せていたら出て来ました
よく見かける文字がウェーブしながら表示されるアレです。
とりあえず外部ライブラリーに助けを求めて探してみたがやはりテキストのウェーブなんてものはなく(もしかしたらあるかもしれない)
そもそもアニメーションってViewそのもののα値変えたり、移動させたり、大きさ変えたり、回転させたりで
TextViewの文字1つ1つに対して都合良くアニメーションなんて出来ないでしょ……
ならば、一文字一文字をTextViewにしてやればいいじゃん!という単純な発想で作りました。
完成系はこんな感じになります。
WaveするTextViewっぽいものの作り方
手順はざっとこんな感じです
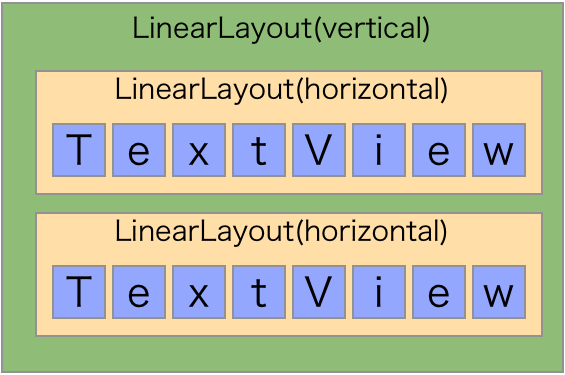
- 1. 親となるLinearLayout(vertical)の中にLinearLayout(horizontal)を追加する
- 2. 1で作成したLinearLayout(horizontal)に一文字ずつTextViewを追加して行く
- 3. 改行が見つかれば1に戻る
というような具合でTextViewを追加していきます。
完成すると以下の図のようなView構成が出来上がります
アニメーションを実行するときは
内包されているTextViewに対してループを回して実行します。
必要なソースコード
LinearLayoutを継承したカスタムViewクラスを作る。
さんざんTextViewと良いながら大枠はLinearLayoutです。
なのでTextViewっぽいものと呼んでいます。
TextViewっぽいもののLayoutクラス
|
1 2 3 4 5 6 7 8 9 10 11 12 13 14 15 16 17 18 19 20 21 22 23 24 25 26 27 28 29 30 31 32 33 34 35 36 37 38 39 40 41 42 43 44 45 46 47 48 49 50 51 52 53 54 55 56 57 58 59 60 61 62 63 64 65 66 67 68 69 70 71 72 73 74 75 76 77 78 79 80 81 82 83 84 85 86 87 88 89 90 91 92 93 94 95 96 97 98 99 100 101 102 103 104 105 106 107 108 109 110 111 112 113 114 115 116 117 118 119 120 121 122 123 124 125 126 127 128 129 130 131 132 133 134 135 136 137 138 139 140 141 142 143 144 145 146 147 148 149 150 151 152 153 154 155 156 |
public class WaveAnimationLayout extends LinearLayout { //アニメーションの終了を通知するリスナー public interface EndAnimationListener{ public void onEnd(); } private static final int DEFAULT_COLOR = 0xffffffff; private static final float DEFAULT_TEXT_SIZE = 25; private static final int DEFAULT_SPEED = 50; private int color; // テキストカラー private float textSizePx = DEFAULT_TEXT_SIZE; //テキストサイズ private int speed = DEFAULT_SPEED; //次のアニメーションが実行するスピード private String text; private int startOffset; //最初のアニメーション開始までのoffset private ArrayList<LinearLayout> linearLayouts; public WaveAnimationLayout(Context context) { super(context); init(); } public WaveAnimationLayout(Context context, AttributeSet attrs) { super(context, attrs); parseAttribute(attrs); init(); } @TargetApi(Build.VERSION_CODES.HONEYCOMB) public WaveAnimationLayout(Context context, AttributeSet attrs, int defStyle) { super(context, attrs, defStyle); parseAttribute(attrs); init(); } public int getColor() { return color; } public void setColor(int color) { this.color = color; } public float getTextSizePx() { return textSizePx; } public void setTextSizePx(int textSizePx) { this.textSizePx = textSizePx; } public String getText() { return text; } public void setText(String text) { this.text = text; init(); } /** * layoutのattrsパラメーターが設定されていれば取得し、設定する * * @param attrs */ public void parseAttribute(AttributeSet attrs){ TypedArray ta = getContext().obtainStyledAttributes(attrs, R.styleable.WaveAnimationLayout); if( ta != null ){ text = ta.getString(R.styleable.WaveAnimationLayout_waveText); color = ta.getColor(R.styleable.WaveAnimationLayout_waveTextColor,DEFAULT_COLOR); textSizePx = ta.getDimension(R.styleable.WaveAnimationLayout_waveTextSize,DEFAULT_TEXT_SIZE); } } public void init(){ setOrientation(VERTICAL); setGravity(Gravity.CENTER); linearLayouts = new ArrayList<LinearLayout>(); addTextViews(); } public LinearLayout createLinearLayout(){ LinearLayout linearLayout = new LinearLayout(getContext(),null); linearLayout.setLayoutParams(new LayoutParams(ViewGroup.LayoutParams.WRAP_CONTENT, ViewGroup.LayoutParams.WRAP_CONTENT)); linearLayouts.add(linearLayout); addView(linearLayout); return linearLayout; } public void setStartOffset(int offset){ startOffset = offset; } public void setSpeed(int speed){ this.speed = speed; } /** * 設定されているtextの一文字ずつ取り出し、TextViewにして * LinearLayoutに追加していく */ public void addTextViews(){ LinearLayout linearLayout = createLinearLayout(); for (int i = 0; i < text.length(); i++) { //改行が見つかれば、新しいLinearLayout(horizontal)を追加する if( text.charAt(i) == '\n' ){ linearLayout = createLinearLayout(); continue; } TextView textView = new TextView(getContext()); textView.setTextColor(color); textView.setTextSize(textSizePx); textView.setTextSize(TypedValue.COMPLEX_UNIT_PX, textSizePx); textView.setText(text.charAt(i) + ""); textView.setVisibility(View.INVISIBLE); linearLayout.addView(textView); } } /** * 内包している全てのViewに対してAnimationを実行していく * * @param endAnimationListener */ public void startWaveAnimation(final EndAnimationListener endAnimationListener) { int offset = startOffset; for( int i = 0; i < linearLayouts.size(); i++ ){ for (int j = 0; j < linearLayouts.get(i).getChildCount(); j++) { Animation animation = AnimationUtils.loadAnimation(getContext(), R.anim.popup); animation.setStartOffset(offset); //最後のアニメーションに対してListenerを設定する if ( j == linearLayouts.get(i).getChildCount()-1 && i == getChildCount() - 1) { animation.setAnimationListener(new Animation.AnimationListener() { @Override public void onAnimationStart(Animation animation) { } @Override public void onAnimationEnd(Animation animation) { if( endAnimationListener != null ) endAnimationListener.onEnd(); } @Override public void onAnimationRepeat(Animation animation) { } }); } linearLayouts.get(i).getChildAt(j).setVisibility(View.VISIBLE); linearLayouts.get(i).getChildAt(j).startAnimation(animation); offset+= speed; } } } } |
anim配下にpopup.xml追加
1つのTextViewにどういうアニメーションをさせるかの定義です。
今回は画面下から跳ねるように出て来る感じにしました。
|
1 2 3 4 5 6 7 8 9 10 11 12 13 14 |
<?xml version="1.0" encoding="utf-8"?> <set xmlns:android="http://schemas.android.com/apk/res/android" android:interpolator="@android:anim/overshoot_interpolator"> <alpha android:duration="400" android:fromAlpha="0" android:toAlpha="1" android:startOffset="200"/> <translate android:startOffset="200" android:duration="400" android:fromYDelta="100%" android:toYDelta="0" /> </set> |
values配下にattrs.xml追加
layout.xmlで文字色や文字サイズをを設定できるように
attrs.xmlを追加します。
|
1 2 3 4 5 6 7 8 |
<?xml version="1.0" encoding="utf-8"?> <resources> <declare-styleable name="WaveAnimationLayout"> <attr name="waveText" format="string" /> <attr name="waveTextColor" format="color"/> <attr name="waveTextSize" format="dimension"/> </declare-styleable> </resources> |
使い方
layout.xmlのファイルにWaveAnimationLayoutを追加します
|
1 2 3 4 5 6 7 8 9 10 11 12 13 14 15 16 17 18 19 20 21 22 23 24 25 |
<LinearLayout xmlns:android="http://schemas.android.com/apk/res/android" android:layout_width="match_parent" android:layout_height="match_parent" android:orientation="vertical"> <workshop.jp.co.aainc.workshop.view.WaveAnimationLayout xmlns:attr="http://schemas.android.com/apk/res-auto" android:id="@+id/waveAnimationView" android:layout_width="match_parent" android:layout_height="wrap_content" attr:waveText="ここに適当な文字を入れます\n改行もいれてみる\nいい感じにアニメーションします\nスピードも調整できるので\n必要ならスピードを調整してください" attr:waveTextColor="#00ff00" attr:waveTextSize="20sp"> </workshop.jp.co.aainc.workshop.view.WaveAnimationLayout> <workshop.jp.co.aainc.workshop.view.WaveAnimationLayout xmlns:attr="http://schemas.android.com/apk/res-auto" android:id="@+id/waveAnimationView2" android:layout_width="match_parent" android:layout_height="wrap_content" attr:waveText="ここに適当な文字を入れます\n改行もいれてみる\nいい感じにアニメーションします\nスピードも調整できるので\n必要ならスピードを調整してください" attr:waveTextColor="#00ff00" attr:waveTextSize="20sp"> </workshop.jp.co.aainc.workshop.view.WaveAnimationLayout> </LinearLayout> |
後はActivityでこのViewを取得し「startWaveAnimation」を呼ぶだけ
|
1 2 3 4 5 6 7 8 9 10 11 12 13 14 15 16 17 18 19 20 |
public class MyActivity extends ActionBarActivity { @Override protected void onCreate(Bundle savedInstanceState) { super.onCreate(savedInstanceState); setContentView(R.layout.activity_my); WaveAnimationLayout waveAnimationLayout = (WaveAnimationLayout) findViewById(R.id.waveAnimationView); waveAnimationLayout.setStartOffset(1500);//アニメーション開始を1.5秒遅らせる waveAnimationLayout.startWaveAnimation(new WaveAnimationLayout.EndAnimationListener() { @Override public void onEnd() { WaveAnimationLayout waveAnimationLayout2 = (WaveAnimationLayout) findViewById(R.id.waveAnimationView2); waveAnimationLayout2.setStartOffset(1000); waveAnimationLayout2.setSpeed(30);//アニメーションの感覚を短くしてスピードを上げる waveAnimationLayout2.startWaveAnimation(null); } }); } } |
これを実行すれば動画に上がっていたような動きになります。
最後に
アニメーションのファイル(今回でいう所のpopup.xml)を取り替えると、他に色々な動きが可能です。
注意点としてテキストの文字が長すぎると自動で改行はされずに画面外に行ってしまうため
サイズの調整に失敗すると、端末によってはすべてのテキストが画面内に収まらないです。
ご利用は計画的にお願いします。
同じ動きができるライブラリがあれば教えてください。参考にしたいです。
明日は しゃかまる の番です
iOSに浮気を始めたAndroidエンジニア? Androidはほとんど書いてない…


